The Conveyor pulley lagging is a very important part of the belt conveying the transportation system. It can reduce belt slippage, improve tracking, and extend the life of the conveyor belt, bearing & other components. It’s widely used in many industries, such as Power, coal mines, cement plants, steel, metallurgy, coal, chemical fertilizer, grain depots, ports, and other industries.
Here is a complete guide for conveyor pulley lagging operation.
1. Conveyor Pulley Lagging Early-stage Preparations
1) Measuring temperature
You can use the object thermometer or infrared thermometer to measure the temperature, including the environment and metal surface of the roller.
2) Measure the humidity
Use the hygronom to measure the humidity of the environment.
3) Check the Dew point value
The dew point value is the lowest temperature on the surface of the roller steel body. You need to find the dew point value according to the “Dew point value query table”.
Note: When the lowest temperature on the steel body surface is lower than the dew point value, a drop of water will be formed. The site shouldn’t be constructed.
4) Check the space for the roller working
The space for the roller working will directly decide whether the roll is removed or not.
Requirement:
- The upper space distance from the roller is more than 1000mm,
- The lower space distance is more than 300mm;
- The left and right distance is more than 1000m
- Time: Calculate by 0.5 square hours per person, if the space is large enough, and the technicians are skilled, two people can work at the same time.
5) Fixed the roller types and specification
The roller can be divided into drive roller, reversing roller, and surface-increasing roller.
- The driving roller is driven by a motor or other power equipment, by which the power is transferred to the conveyor belt.
- A reversing roller can change the initial running direction of the conveyor belt, which does not transmit power to the belt.
- The surface-increasing roller is used to increase the contact area between the driving roller the reversing roller and the conveyor belt.
You should confirm the conveyor belt speed, site environment, and load-bearing conditions, fix the shape and thickness of the wear-resistant rubber pulley lagging. Measure the length and diameter of the roller and calculate the amount of material.
Note: The driving roller needs to be carved on the black surface of the wear-resistant rubber pulley lagging, it should be finished before entering the site. the carving depth should be half of the thickness of the plastic board, if there are several pieces of plastic board, the board grain should be consistent.
The thickness details:
| Roller Diameter | Pulley Lagging Thickness |
| Diameter ≥600mm | Thickness:8-10mm |
| Diameter ≥800mm | Thickness:10-12mm |
| Diameter ≥1000mm | Thickness:15-20mm |
Note: Please strictly follow the actual design standards.
6) Fixed the distance and the hoisting ways
We should confirm the distance between the conveyor belt and the roller, and make sure there is enough space to work.
Requirement: The lifting height shall be to let people stand in front of the roller normally and have a certain amount of space to back up. When lifting all the adhesive tape from the roller, it cannot contact the roller.
7) Confirm power supply for tools
Requirement: Voltage: 220v, Power: 4kw. If you need to do the down-hole operation, please make sure that all the tools are not explosion-proof, and your clients need to do the special downhole operation procedures. The electrician should be there all the time.
8) Fixed the material and transportation
Essential tools: measuring calipers, tape, folding rule, marking powder cord, rubber marking pen, Dan Carcross knife, layering knife, layering stripping hook, cleaning brush;
Personal protective equipment: helmet, work clothes, helmet shoes, gloves, flashlight, protective glasses, earplugs, work notebook, work permit.
9) Space available for Conveyor Pulley Lagging cleaning and brushing
A place should be available on the site to clean the glue board and brush the glue. The place should be as flat as possible, keep drying, no dust. Because the water and dust will affect the glue bonding effect.
10) Prepare four iodine tungsten lamps or halogen lamps
The iodine tungsten lamps are used to raise ambient temperature, they should be placed in front and rear of the roller. at least 30cm from the roller.
11) Material recommendations
A Diamond/Ceramic conveyor pulley lagging is recommended for the drive roller wheel. For the guide wheel, tailwheel, and tensioning wheel: it is recommended to use a flat plastic plate with no slotted surface.
2.Conveyor Pulley Lagging Operation Process

1) Disconnect the power supply and hang the safety warning board.
We shovel glue according to the status of residual glue on the roller surface. If the residual glue exceeds 0.5m, a shoveling glue machine must be used to remove the residual glue.
Before shoveling the glue, the roller must be rotated by humans. If it cannot be rotated, the connecting pin between the roller and the reducer must be removed. If the residual adhesive area is less than 0.5m, then there is no need to shovel the adhesive.
Note: When shoveling the glue, the angle between the flat chisel and the roller surface should be 15-30 degrees, or it will shovel off the steel body, and damage the flat chisel.
2) Polishing
There are many dirt, dust, grease, water, rust, and other organic or inorganic contaminants on the surface of the metal, which affect the wetting of the glue.
In order to improve the bonding strength, it is necessary to adopt mechanical, physical, chemical, and other methods to rough, clean, activate the surface of the adhesive, and change the surface properties.
It can facilitate the glue infiltration, make the glue have a firm binding, and finally improve the durability and service life of the bonding.
After the surface treatment, the metal surface can be changed into a kind of adhesive surface with high activity and high effective area.

There are two ways that can solve the problem, mechanical grinding and sandblasting. They can provide the surface with appropriate roughness, increase the effective bonding area, improve the glue to the surface of the adhesive infiltration, and the adhesion performance.
For the metal surface treatment of the roller, we usually use the steel brush or grinding machine to brush the loose oxide layer.
At present, the angle grinder with a tungsten steel buffing disc to do the grinding treatment, not only can improve the grinding efficiency but also prevents the aging phenomenon on the surface of the roller.
3) Cleaning
After polishing the surface, there is a lot of dirt, dust, grease, water, rust, and other organic or inorganic pollutants, which affect the glue adhesive effect.
We should use a cleaning agent to clean the surface. The cleaning agent should have good quality, which can protect the metal surface from corrosion.
You can clean it several times to make sure the surface is totally clean. After the cleaning, dry it for some time, it can guarantee a good adhesive effect for glue.
4) Transition
Brush a layer of metal primer evenly on the roller metal surface. Waiting an hour to let it dry completely.
The metal primer can not only prevent surface pollution but also prolong the storage life of the treated metal. It’s a great way to guarantee the wetting performance of the adhesive and increase its adhesive strength and durability.

5) Gumming
Evenly brush the prepared cold vulcanized glue on the roller metal surface, and let it dry completely. The drying time is about 15-45 minutes.
Brush the second layer of cold vulcanized adhesive after the first glue dries completely. After the second glue can slightly stick to the hand, you can do the final surface bonding.
The bonding surface of the common glue board should be polished and cleaned first, then brush the glue twice. TRS or REMA adhesive is recommended, they only need to be brushed once, and there is no need to polish and clean it.
6) Bonding
You should fix the bonding reference line on the roller surface first. After the second glue brushing, it’s easy to find the reference line for the bonding pulley lagging.

Here is the line drawing method:
- Take the two sides of the roller as the reference, draw the reference line with a square, steel ruler, and knife.
- Cover the semi-vulcanized layer of the Conveyor Pulley Lagging with a clear plastic film.
- Using the reference line found on the roller as a reference, tear the plastic film about 50mm wide and start to paste the Conveyor Pulley Lagging on the surface of the roller.
- After confirming the correct position, start to tear off the plastic film. While tearing it off, wipe it down with your hands. Note: Don’t tear it too much, or it will be very firm after being glued and cannot be torn off
- If the sticking is skewed and the sticking area is not large, you can drop the cleaning agent between the Conveyor Pulley Lagging and the metal body of the roller and slowly tear it off. Then brush cold vulcanized adhesive to the area where the Conveyor Pulley Lagging and the roller are pasted, and then paste it after it dries slightly.
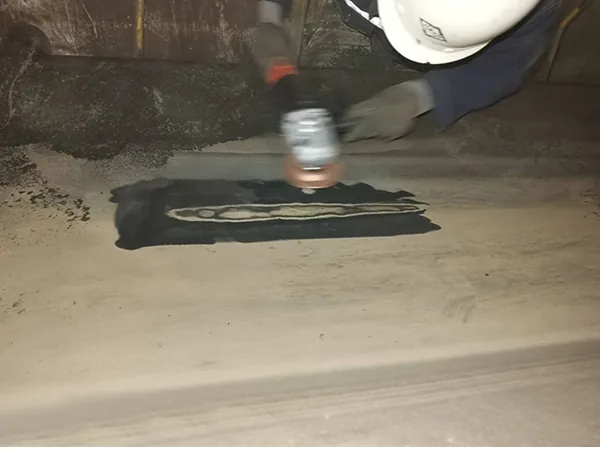
7) Sealing
Use a knife to cut out the V-shaped opening at the seam of the Conveyor Pulley Lagging. The width of the outer opening is 15mm. Polish the V-shaped opening with a steel wire polishing brush, then brush off the rubber powder.
Next, you should brush the T2 adhesive to the V-shaped opening twice. Then use the T2 extrude gun to fill the T2 adhesive, at the same time, keep pressing down with a compacting roller.
8) Trimming
Use a rubber knife to cut off the excess rubber at the edge of the roller. Keep the angle of the rubber knife at an angle of 45° with the surface. While rotating the roller, remove the excess rubber.
Conveyor Pulley Lagging Installation Notes:
1. Temperature above 10℃, relative humidity less 90%, no water, control the dust.
- Polish and polish thoroughly, and make sure there is no residual glue, rust spots, pits, or flaps.
- Brush the metal primer or metal treating agent evenly, and dry thoroughly. You can use a hot air dryer or other dry tools.
- Brush the glue evenly twice, brushing it from one direction to another, it can avoid the failure of glue wrapping caused by bubbles. Brush the glue twice only when it is dry, and brush the glue only when it is dry for the second time.
- Roll and knock from the middle to both sides during gluing, so as not to produce bubbles and lead to failure of gluing.
- Sealing, the size should be calculated, and no gaps or blobs should be allowed.