Traditional conveyor belt splices are typically connected through mechanical fasten, cold vulcanization b, or hot vulcanization. The screw splice represents a new form of rubber conveyor belt splice, marking a significant reform. It is an assembly-style belt connection structure known for its ease of operation, stable performance, and enhanced tensile strength. Additionally, it addresses issues related to adhesive bonding difficulties, prolonged curing times, and poor bonding results in challenging conditions such as humidity and high temperatures. This technology makes conveyor belt splice more convenient, quick, and efficient.
Below are the installation and usage steps for the Screw Splice:
Step 1: Prepare the Tenon
(1) Based on the length inside the Screw Splice’s groove, remove the upper and lower rubber layers from both ends of the conveyor belt to create a tenon (approximately 11 cm in length, depending on the specific joint sleeve dimensions). If a diagonal joint is required, measure the diagonal length and remove the rubber accordingly.
(2) If the belt thickness exceeds 5mm, you can use a grinding machine to thin both sides of the belt’s front end by 1 cm to facilitate installation.
Step 2: Install One End First, Then the Other
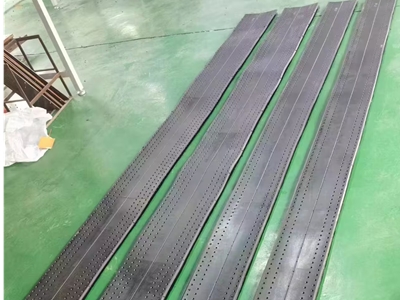
Note: The Screw Splice has a central groove line for the working face and three groove lines for the non-working face.
- Insert one end of the stripped belt into the Screw Splice, ensuring it goes all the way in. Start by screwing in the outermost row of self-tapping screws. Tighten them from the center towards both sides for proper positioning.
- Using a cordless electric drill, create holes on the belt’s surface according to the marked positions on the joint sleeve. Insert the specially designed “special inner-threaded joint screw” into the holes on the joint sleeve and tighten them gradually from the center towards both sides using a hexagonal screwdriver.
- Screw in the inner row of self-tapping screws in the same manner, tightening them from the center towards both sides.
- Repeat the above steps (1), (2), and (3) to install the other end. Ensure that both ends of the belt and the joint sleeve form a straight line during installation.
Step 3: After Installation, Inspect the Belt’s Bottom Surface Check for any exposed threads at the bottom of the screws. Use a grinding machine to smooth them out, completing the joint.
Installation Considerations:
- Screw Splice Width: The Screw Splice’s width should be slightly narrower than the conveyor belt’s width to prevent belt misalignment and damage to the splice, which could affect its lifespan. Typically, the joint sleeve is about 10 mm narrower on each side compared to the belt’s width.
- Self-Tapping Screw Installation: When installing self-tapping screws, ensure that they are perpendicular. Pay special attention to the outermost row of self-tapping screws, which should not be tilted outward, as this can affect the strength by preventing proper tightening. The tips of the self-tapping screws should ideally protrude 1-2 mm. After screwing in all the screws, use a grinding machine to smooth any exposed screw parts at the bottom. If the bottom piece is not securely tightened and lifts, additional self-tapping screws can be added through small holes on the bottom surface.
- Tightening the Special Inner-Threaded Fixing Screws: To tighten these screws, do it in three rounds, gradually increasing the torque. Rubber is an elastic material, so it needs to be gradually tightened. Typically, the torque ranges from 150N to 200N. Follow the principle of “tightening from the center to both sides.” After some time in operation, check if the screws have loosened and tighten them if necessary.
- Peeling the Non-Working Face Rubber: If the conveyor belt is relatively thin, peeling the rubber from the non-working face can be challenging. In such cases, use a grinding machine to remove the rubber, or peel off the rubber layer along with a layer of fabric.
- Additional Notes: For conveyor belts with a high material load, adhesive bonding can be used in conjunction with the joint sleeve, using conveyor belt cold bonding adhesive, to achieve even greater tensile strength.
- Important: When drilling self-tapping screws, please place a wooden board beneath the belt!
In conclusion, the Screw Splice offers a more efficient and versatile solution for conveyor belt splices, simplifying installation, increasing tensile strength, and ensuring reliable performance in various operating conditions.